 Melodie
A Fast & Easy Way to Edit Your Images in InDesign
A Fast and Easy Way to Edit Your Images in InDesign
Another great feature in InDesign is that you can quickly make a change to your image in Photoshop and automatically update the image back in InDesign, without having to find and open the file on your computer.
In this tutorial, I’ll show you how to open and edit your image in Photoshop straight from InDesign.
Get my FREE InDesign Mini Course
Get access to my 5-lesson video course to learn how to create blog graphics, checklists, worksheets, promo graphics and more.

If you enjoyed this video, would you consider a repin? Thanks!
How to Create a Blog Post Graphic with InDesign
How to Create a Blog Post Graphic with InDesign
When you want to design graphics for your blog posts, InDesign may not be the first design tool you think of. However, it’s actually pretty easy to create and export web-ready graphics for your blog with Indesign, and in this video, I’ll show you how.
Get my FREE InDesign Mini Course
Get access to my 5-lesson video course to learn how to create blog graphics, checklists, worksheets, promo graphics and more.
If you enjoyed this video, would you consider a repin? Thanks!
How to Create a Design Style – Part 1
How to Create a Design Style – Part 1
This is part 1 of my series “How to Create a Design Style.” You can find the other posts in the series at these links:
A design style – sometimes called a style guide, brand board or brand style guide.
We all know we need one. That consistent look to our brand that gives us credibility with our readers and increases our social shares. The style that will be carried through everything we design for our business – our website, blog post graphics, content upgrades, on and offline promotions – everything.
But how do you go about creating one? While it is a fairly simple process, it can take some time and definitely takes some research and thought. Especially if you tend to be a perfectionist like I am.
The way to find a design style is basically to answer a few questions about your audience, message and niche, and then use the answers to these questions to choose the fonts and colors that will best fit the look you’re trying to create.
In this post, I’ll be talking about laying the foundation by asking the right questions.
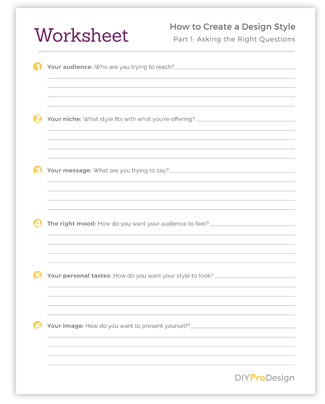
Part 1: Laying the Foundation
As I mentioned, the first thing to do when you’re creating a design style is to answer a few questions in relation to your audience, your niche, your message, and the overall image you’d like to convey.
It will be the answers to these questions that will guide you to finding a style that you’ll love and that will also communicate your message well with your readers:
1. Think about your audience – Who are you trying to reach?
The first thing you have to do is think about the people you’re going to be talking to. Who are they? Are they male or female? What are their ages? What do they like? How do they think? Think about what type of style would appeal to them and also, what style they’d be most likely to respond to.
Would they respond to bright, bold colors with contemporary fonts? Or maybe they’d respond better to more muted colors and traditional fonts.
This is a very important first step because you want your style to “speak” to the people you’re trying to reach and create a favorable impression with them, and to do that you definitely need to know who it is you’re talking to.
2. Think about your niche – What style fits with what you’re offering?
What style would normally go with your topic, product or service offering?
For example, a blog about mountain climbing might have more of a rugged, outdoors style while a site for a yoga studio might have a look that’s more simple, zen and serene.
3. Think about your message – What are you trying to say?
What message do you want to get across to your audience, and what style would best convey that message?
Again, you want your style to “speak” to the people you’re trying to reach and create a favorable impression with them.
For example, a subdued style would go better on a site for a non-profit women’s shelter with a somber message, while people coming to a blog about decorating and home decor would respond better to a style with a much brighter feel.
Which leads me to the next question . . .
4. Think about the mood you want to create – How do you want your audience to feel?
Design is all about communication, and creating the right mood can go a long way in helping to get people “on board” with what you’re trying to say to them. It helps them get involved with your message and will hopefully move them to take whatever action you are wanting them to take.
Take the home decor blog again – or better yet, a home decor retail site. The feel of the site will probably be very bright and airy, with gorgeous pictures of beautifully decorated rooms. So what would that do for you as you look at a site like that? I know that for me, it would put me in the mood to look around and get decorating inspiration, and possibly see if there’s something I’d like to buy for my own house.
So what mood would best get your message across? What style would create the right “feel” for your message and help your audience respond in the way you want them to?
Do you want people to feel invigorated or excited? Or maybe laid back and relaxed?
It all depends on what you’re trying to say to your audience and what you’d eventually like for them to do.
5. Think about your image – How do you want to present yourself?
Lastly, what overall image do you want to present to your audience or how do you want your style to come across? We all know that we want to present a credible, professional image and that will of course be part of everything we do. But we need to get slightly more specific.
Do you want your overall look to appear high-class and sophisticated? Or more low-key and easy going?
The answers you give in the 4 previous questions will also play a part in this. The style that will best fit your audience, niche, message and the feel you want your style to have will be part of the overall image you create, and it’s a good idea as you go along to think about exactly what image you want that to be.
Next Steps: Choosing Fonts and Colors
As I’ve already mentioned, once you have the answers to these questions, you’ll be able to use them as a guide as you start looking for the fonts and colors that will make up your style.
In Part 2 of this post, I’ll be talking more about choosing fonts, and how you can use them to create different moods with your designs.
Things to Remember
Creating a design style is definitely a process. It can take some time to really settle on something you like, and remember it’s okay to change your mind – you probably will several times. I know I have for projects I’ve worked on.
In the end, the best design style is going to be one that you really like, and will also cause your audience to get involved with what you’re trying to say. Your style will help bring your audience on board with your message, and will give you a consistent look that will create the credible and professional image that you’re looking for.
Is there something you’ve always wondered about design but didn’t know who or how to ask? Post your questions in the comments below and I’d be happy to help!
Would you like a free worksheet?
Subscribe to my free Resource Library to get access to all my freebie downloads like pdf worksheets and checklists, plus InDesign template downloads.

About the Author
Hi! I’m Melodie, and I help bloggers and solopreneurs create their own graphics for their businesses. I’ve been a graphic designer for over 20 years, and I can tell you that just by learning some basics, you can definitely create a professional look for your brand, even if you don’t see yourself as a designer.
Top 10 Pro Design Tips for Any Project
Top 10 Pro Design Tips for Any Project
Good design is all about communicating well with your audience, and these tips can add professional polish to to any project and help to make sure you get your message across.
1. Keep it Simple.
With design, less really is more. Keeping it clean and simple will help make sure your design does not detract from your overall message.
Try to keep the number of fonts you use to 3 or 4 at the most, and be careful not to use too many design elements.
2. Keep it Uncluttered.
Don’t go crazy with too much information. Keep your text straight and to the point, only including what’s absolutely necessary.
Keeping your design clean and uncluttered will make your message clear and keep from confusing or overwhelming your audience.
3. Keep your fonts readable.
Your fonts can either make or break your design. If your design isn’t readable, your message will not get across.
Try to stay away from fonts that are too ornate or gimmicky, and make sure they’re at a readable size. Especially body text.
If you’re not sure, try reading your text yourself. Is it comfortable to read? If not you may want to find another font or tweak what you have.
4. Is there enough white space?
One way to help keep things readable, clean and uncluttered is by making sure you’ve got enough “white space” in your design, or distance between elements.
Is there enough space around your logo? What about between design elements or lines of text? Is there enough space between the edge of the document and your text?
Making sure you have enough space between elements will make your design comfortable to look at and won’t take away from your overall message.
5. Are your colors pleasing?
Try to keep colors simple, only using 3 or 4 at the most, and it’s also good to make sure you’re not using too much of one color in one place.
Take a step back and ask yourself, is this too bright or too bland? Or, is my color making a certain part jump out too much?
If so, maybe try to “distribute” your color a little differently, and tone down the shade you’re using if it’s too bright.
If it’s too bland, try adding small amounts of an accent color. One way to find a good accent is to use colors that are opposite from each other on the color wheel. Click here for a link to a good online tool.
6. Make sure it has contrast.
To keep your design from looking flat and boring, try to create contrast with your colors and also with your font styles. With color, you can create contrast by making sure you have a good range of lights and darks.
You can create contrast with fonts by having a main display font and a simple but different body text font. Some fonts could also be made bold and some more thin or light.
7. Does the information flow correctly?
Make sure that the message of the design reads correctly. You can make certain parts stand out with larger font sizes and brighter colors, and you can make less important things smaller with the colors more muted.
Your design should lead the reader’s eye through the information in a certain way to make sure the most important parts stand out the way they’re supposed to.
Take a step back and look at your design. How does it read? Does your eye naturally go through information the way it’s supposed to?
8. Check the alignment of your design.
Is everything aligned that could be? It definitely makes a design look much cleaner if text and graphics are lined up with each other in some fashion.
For example, could the left side of your body text be lined up with the left side of your header? Or if there is a section where design elements and text are grouped together, could those be lined up in a certain way? Is everything centered that should be?
Every design is different, so definitely use your judgment with this. Sometimes using a grid can help as well.
9. Use quality photography.
Your choice of photography can definitely make or break your design. Beautiful, high-quality images can really add pizzaz to any project, but nothing will kill it faster than badly composed or poorly lit photos.
There are many sites online that have affordable or even free options for high quality photography. See a list here on my resources page.
10. Check your artwork.
Does it stand out too much? Any artwork or design elements you have should serve to enhance your main message, not detract from it.
You also want to make sure your images are set up correctly for print or web. For print, images should be at a resolution of at least 250 dpi (dots per inch), and web images should be at 72 dpi.
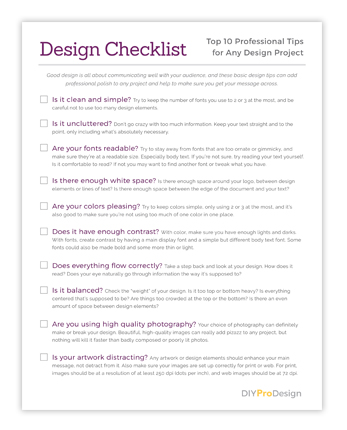
Would you like a Free Checklist?
Subscribe to my free Resource Library to get access to all my freebie downloads like pdf worksheets and checklists, plus InDesign template downloads.